Saturday 22 December 2012


As of August 25, 2010, you can call landline phones or mobile phones from Gmail. All you need to do is ensure that the application that enables you to call is installed, and dial the number!

EditSteps

  1. 1
    Open your Gmail account. If you do not have one, create one.

    Go with Gmail

     Free Email by Google Switch to Gmail, Sign up now!
    www.google.com
  2. 2
    Go to "Chat" on the left hand side of your Gmail screen.
     Go to "Chat" on the left hand side of your Gmail screen.
    Go to "Chat" on the left hand side of your Gmail screen. Look for the tab that says "Call phone". There will be a green phone symbol located next to this line.

    This image shows you the location of the application
    This image shows you the location of the application
    • You will need to have installed and activated the voice and video plug-in if you haven't already done so.
    • If you don't see this "call phone" line near chat it may be because Google has not yet enabled your Gmail account for this service. They began rolling this out on August 25, 2010 and will require at least several days to activate all accounts.
    • If you don't see this "call phone" line near chat it may be because your Gmail language setting is different than 'English', it is visible for 'English' only.
  3. 3
    Click on the "Call phone" tab. A box will appear, telling you about the service.
    • The box explains what the service is, that US/Canada calls are free in 2010, and that emergency calls cannot be made via Google Voice.
       The box explains what the service is, that US/Canada calls are free in 2010, and that emergency calls cannot be made via Google Voice.
      The box explains what the service is, that US/Canada calls are free in 2010, and that emergency calls cannot be made via Google Voice.
  4. 4
    Click "Accept" once you have read the box. This means that you're acknowledging that you understand and agree to Google's terms of use.
  5. 5
    Look for the call box on the page.
     Look for the call box on the page.
    Look for the call box on the page.
    • Enter either a phone number or the name of a contact. Use the dial pad to enter numbers, or just type in a name.
    • If you make a mistake when entering a number on the dial pad, just use the delete button of your keyboard.
  6. 6
    Press the blue "Call" button at the base of the dial box and your call will start dialingHave a conversation from your computer with someone on their phone, wherever they may be!


EditTips

  • Calls to the US and Canada are free in 2010. International calls are billed at low rates.
  • Click on the flag icon to open a drop-down menu that displays all the country dial codes.
  • Click on the money amount to reveal a drop-down menu for history details, rates information, and the ability to add credit.
  • The clock icon represents "call history".
  • It is not clear yet whether Google intends to change Google Voice, or keep this new feature as an entirely separate application.[1]

EditWarnings

  • If this call application isn't on your computer yet, you may need to wait. Alternatively, it will mean that you need to download the voice and video plug-in if you haven't already enabled this. Here is the download link: http://www.google.com/chat/video.
  • Google Voice is an enhanced call management application and is not capable of placing and receiving emergency service calls. Read the complete Terms of Service.
  • Be aware that there is a problem with many users getting caught in an endless loop of trying to install the voice plugin, trying to make a call and then being told to install the voice plugin again. This has been going on for 5-6 months, Google is aware of the problem but still hasn't done anything about it. It doesn't seem to be browser specific, but only happens to users of browsers other than Google's Chrome.

With the Office Web Apps viewer, you can open Microsoft Office Documents in the browser or embed them into your website.

Google Docs Viewer
The formatting is often not retained when Office documents are opened inside Google Docs Viewer
Google Docs Viewer is a useful service that helps you preview Microsoft Office files in the browser itself. The online tool can come handy when you don’t have the Office suite installed on your computer or when you would like to quickly preview the content of an online document without having to download it locally.
Office Web Apps, Microsoft’s answer to Google Docs, too offer a similar online document viewer that is superior to Google’s tool as it retains the formatting while rendering the document in the browser.
For instance, here’s a standard PowerPoint presentation (PPT) in Google Docs Viewerand the same file rendered inside Office Viewer. Next, compare a slightly-complex Word document (docx) inside Google Viewer and Office Viewer. The latter retains all the styling and even the fonts look sharp there.

How to Use Office Web Apps Viewer

If you are to open an online document/spreadsheet/presentation inside the Office viewer, all you need to do is append the URL (web address) of that file to “view.officeapps.live.com” as shown in the following examples:
http://view.officeapps.live.com/op/view.aspx?src=http://img.labnol.org/di/Word.docx

http://view.officeapps.live.com/op/view.aspx?src=http://img.labnol.org/di/PowerPoint.ppt
In addition to previewing Office files, the same Office Web Apps Viewer tool can also be used for embedding Microsoft Office documents into your website or blog. The embed code would be something like this:
<iframe src='https://view.officeapps.live.com/op/embed.aspx?src=http://img.labnol.org/di/PowerPoint.ppt' width='500px' height='350px' frameborder='0'></iframe>
You need to replace the actual URL of the document and may also adjust the height and width attributes of the IFRAME tag.
While Office Web Apps viewer is definitely a better option that Google Docs Viewer, a limitation is that it only works with Office Files, Google Docs Viewer can also handle PDFs, Photoshop files and even AutoCAD drawings.

The new size search operator in Gmail helps you locate all the big emails in your Gmail inbox that have large file attachments.

Gmail Search by Size
Search Gmail messages by Size using the undocumented “size” operator
Wondering what email messages are eating up all the Gigabytes of space that you have in your Gmail mailbox? There are Google Scripts and external web apps that let you discover all the space-hogging email attachments but you don’t need them anymore.
Gmail supports an undocumented “size” search operator that will let you quickly find all the big emails in the mailbox whose size exceeds a particular threshold. The search syntax is:
size:[size in bytes]
To give a real example, a Gmail search query like size:5242880 will list all big emails who size is 5 MB or greater while size:10485760 list messages that are bigger than 10 MB.
The size operator requires size in bytes (1 MB = 1048576 Bytes) but to make things a bit easier to remember, you can also think of the number as 1 followed by 6 zeros.
Update: As some have pointed in the comments, you may now specify the size in MB as well which makes it a lot easier. For instance, size:5MB (or even size:5M) will find all Gmail message that are 5 MB or greater in size.
Once you have spotted the large emails attachments that are taking too much space, apply the #googleDrive label to directly save those attachments to Google Drive before deleting them from your Gmail mailbox.

Gogle Plus show how your website is performing in Google search results – it displays how many times your articles appeared in Google results and the clicks.

if you have previously linked your website(s) to your Google+ profile usingauthorship tags (or through rel=author), you can now see some important stats about your incoming Google search traffic right inside Google Plus itself.
Google Search Traffic
Go to plus.google.com/authorship/analytics and it will show you Impressions (number of times your articles appeared in Google search results) as well as Clicks (number of times your articles were clicked in Google results) for the last 30 days. The report also carries similar stats for individual pages on your website(s).
Getting on the front page on Google is important (impression) but unless search users aren’t clicking on your page in search results (click), that rank is mostly wasted. That’s where good titles and meta descriptions can make a difference.
The reports in Google+ do not display your site’s exact ranking in Google Search but if the “impression” count is 100K or greater, your site is performing quite well and you probably need to work on factors that will further improve the click-through rate (or clicks).
Update: It looks like these reports in Google+ aren’t available to all publishers yet and hence the above link could be returning a 404.

If you are reading this, you probably created a new blog or website and you are wondering why your site is not showing up on the results of Google, Bing or Yahoo.   It happened to me.  I created my blog and five minutes later I was typing my blog address in Google and expecting to see my site on the results.  Now, they say it takes 4 to 6 weeks to be “crawled” by the search engines.  I found a way to speed up the process and have the site show up in about 48 hours.  This post is an update of my earlier post on the topic.
What I learned in the last couple of weeks is that there is more than receiving your website as result of a search for the website address.  That is the easy part.  You will also need to receive your website as a result of a search for content.  That means that somebody searched for a topic (not your web address) and your site got listed.   Here are the two steps needed to get your site active with the search engines:
Submit your site to the search engines.  Search engines use computer programs to search the web for new and modified sites to index them and use that information in their searches.  This is called crawling.  Until your site is found and indexed it will not come up at all in any search.  By submitting your URL to the search engines, they will look for your site the next time they crawl.  That means your site will be found in about 48 hours.
Submit your sitemap to the search engines.  When your site is found through crawling, the search engine does not know the structure of your site.  Sitemaps tell search engines the structure of your site and help them increase the coverage of your site.  This allows a complete indexing of the site and better chances to be a relevant result for a search and getting listed closer to the first position.
Note: If you are using WordPress.com you don’t have to worry about submitting your sitemap to the search engines.  WordPress.com automatically sends updates to search engines every time you add, update or delete a page or make  a post.  You still get value from using Webmaster Tools and verifying your website. If interested you can follow the steps below.
The following paragraphs will give you the step by step instructions to submit your site and sitemap.  I have included the direct links needed to complete the tasks in the shortest time possible.  At the end of the article you can find further readings on the topic.

Submit Your Website

You only need to follow the links provided for each search engine.  Next, you type your URL, or website address,  in the space provided.  Finally, press the submit button and you are done.
  1. Add Your URL to Google.  Google also provides a text box to comment on the site being submitted.
  2. Submit Your Site to Bing.  You should type the address of the home page.
  3. Submit a Website or Webpage.  Yahoo give you the option to submit a website or a feed.  For more information on web feeds read this post.

Submit Your Sitemap

sitemap is a list of pages of your site that are available to crawling.  In order to submit your sitemap to the search engines you will need to
  1. Create or Identify Your Sitemap,
  2. Verify Your Website with the Search Engines using Webmaster Tools, and
  3. Submit Your Sitemap inside the Webmaster Tool.
Create or Identify Your Sitemap. If you are using WordPress you don’t have to worry about creating a sitemap.  WordPress has already created one for your and its address is
yourblogname.wordpress.com/sitemap.xml
If your are not using WordPress, you will need to verify with your provider/host, or you can create your sitemap.  There are a number of free websites that will help you generate your sitemap.  For a good list of sitemap generatorsclick here.  Please choose a sitemap generator and follow the instructions provided.  Your sitemap address will probably be the same one mentioned.
Webmaster Tools.  To submit your sitemap you will need to use the Webmaster Tools provided by each search engine.  Webmaster tools are free service that allow you to see all kind of statistics about your blog or website.  You can submit a sitemap, site feeds, see how the search engine index the site, check and alter crawl rate (how often they look a your site) and see what keyword searches led to your site.  Although these services are beyond the scope of this post, it is good to know you will be getting a lot from the webmaster tools.  Here, we just need to examine how to submit a sitemap.
Submitting your sitemap in a webmaster tools will require creating an account with Google, Bing and Yahoo.  If you have an existing account with any or all the sites, you can use it to get access to the webmaster tools.  For your convenience I include the links to the webmaster tools:
  1. Google Webmaster Tools.
  2. Bing Webmaster Tools.
  3. Yahoo Site Explorer.
Once you create your account and enter the webmaster tool, you will add your website.  You will be asked to verify you own your site.  The webmaster tool will give you instructions on verifying your site.  You can also follow these instructions.
Submit Your Sitemap.  The las step is to submit your sitemap address inside the  webmaster tools.  After you have an added and verified your website to the webmaster tool, you can add your sitemap within the tool.  Find and follow these links:
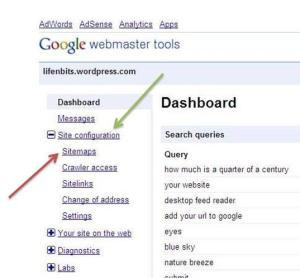
Google.   On the left-hand side, Site Configuration –> Sitemaps –> Submit a Sitemap.  Enter the sitemap address.
Bing.  To the right of your website, press Add Sitemaps.  Enter the sitemap address.
Yahoo.  On the left-hand side, press Feeds.  Complete the address of the sitemap in the text box provided.  For example, type sitemap.xml.  Press Add Feed.
You have now completed all the steps needed to bring your site up to speed with the major search engines.  You will be able not only to search for your website but also for content within your site.  Please type your comments, questions and suggestions.

Learn how to turn the standard YouTube video player into an audio player and embed it in your website using simple CSS.

How do you embed only the audio portion of a YouTube video in your web pages.
A popular option would be that you extract the audio portion of that YouTube video and then use the Google MP3 player to embed that MP3 fil into your website. This will work but YouTube is very likely to have a problem with your approach.
The other approach could be CSS based where you embed the regular YouTube video player and then use the magic of CSS styles to hide the video inside the embedded player. See demo:

This internally renders the YouTube player using the IFRAME player and should therefore work on both desktop (Flash) and mobile (HTML5) browsers.
Without boring you with the technical details, here’s the little HTML code that turn the YouTube video player into an audio player. Simply replace the youtubeID with the ID of your YouTube video and you are done.
<div style="position:relative;width:267px;height:25px;overflow:hidden;">
  <div style="position:absolute;top:-276px;left:-5px">
    <iframe width="300" height="300" 
      src="https://www.youtube.com/embed/youtubeID?rel=0">
    </iframe>
  </div>
</div>
The YouTube logo inside then player, when clicked, will transport you to the original video hosted on the YouTube website.

Would you like to watch movies and popular TV shows on Hulu from outside the US? Now you can with a simple add-on that requires no configuration.

Watch Hulu Outside the US
Hulu.com is one of the best places on the web where you can watch movies and popular TV shows for free. All you need is a web browser with the Flash Player and you are good to go.
Hulu at this is time is only available in US but there’s an a new browser add-on called MediaHint that makes it dead-simple for anyone to access Hulu from anywhere in the world. Just install the extension and there’s absolutely no configuration required.
MediaHint is available for Firefox and Google Chrome (how to install). I was looking at the source code of the Chrome add-on and turns out that it merely changes the proxy server settings of your browser when you try accessing a Hulu video. Here’s the relevant snippet:
function FindProxyForURL(url, host) {
    var usa = ['hulu.com', 'netflix.com', 'pandora.com'];

    var direct = ['assets.hulu.com', 'll.a.hulu.com', 'ads.hulu.com', 'stats.pandora.com', 'blog.netflix.com', 'nordicsblog.netflix.com', 'blog.pandora.com'];
    for (var i = 0; i < direct.length; i++) {
        if (host.indexOf(direct[i]) > -1) {
            return 'DIRECT';
        }
    }

    if (host.match(/audio.*\.pandora\.com/) || host.match(/const.*\.pandora\.com/) || host.match(/mediaserver.*\.pandora\.com/) || host.match(/cont.*\.pandora\.com/)) {
        return 'DIRECT';
    }

    for (var i = 0; i < usa.length; i++) {
        if (host.indexOf(usa[i]) > -1) {
            return 'PROXY 50.116.59.63:80';
        }
    }
    return 'DIRECT';
}
In addition to Hulu, the same add-on may also be used for accessing music site Pandora and movie-streaming site Netflix from outside the US.

You can pass more Google PageRank to your blog posts if you decrease the number of links on your blog’s homepage and archive pages.

Most blogs use the following layout for their home pages and the archives. There’s the title of the post, a short excerpt (description) and a “read more” link that points to the full article. Some blogs may also add a featured image near the post’s excerpt.
Blog Layout
A common layout for blogs
There’s one little problem with the above layout though – it wastes your Google PageRank and thus may not be the most optimal layout as far as SEO is concerned.
Let me try explaining it in simple English.
Your blog’s homepage has a finite amount of Google PageRank that is equally distributed among all the links that exist on that page. Thus, if you put 10 links on a web page whose PageRank is 5, each of those links is passed 0.5 PageRank. If you decrease the number of links from 10 to 5, each of the links will be awarded with a PageRank of 1.
In the above example, there exist 2-3 links per post on the homepage – the post title (1), the featured image (2) and the “read more” link (3). If you can have just create one link from the home page to the inner post page, the linked page will get more PageRank which may benefit them in organic search rankings.
How? A possible solution is that you get rid of the “read more” link on the blog homepage (and archive pages) and instead apply a different CSS style to the post titles so that they instantly appear as links – you can use a different font family, increase the font size and maybe apply a different color (like some shade of dark blue).

You can run the iOS Simulator app in any Windows browser and test your web designs without even having an iOS device.

iOS Simulator App
The iOS Simulator is primarily targeted at Apple developers for them to develop iPad and iPhone apps on a Mac. That said, if you create websites, you can also use the iOS Simulator app to test your web designs on an iPhone or iPad without actually having the device. The iOS Simulator includes the native Safari app that is very close to the real thing.
The iOS Simulator app is only available for the Mac but if you are Windows or Linux, you can use the Browser Stack tool to run the “official” iOS Simulator directly in your web browser without installing any software.
To get started, create an account at Browser Stack and then choose “iOS” as the platform. Put your website URL in the input box and choose an iOS device – they offer the iPhone 3GS/4/4S/5 and iPad 1/2/3 loaded with various version of iOS. You can also switch devices while you are inside the iOS Simulator (see the above screenshot).
This is like you are connecting to a remote Mac using your browser and that computer is running the iOS Simulator app. While you are inside the Simulator, tap (i.e., double click with your mouse) the Safari icon and launch any of your websites.
iOS Simulator in Windows Browser
Unlike the fake emulators, what you are now using i very similar to the actual Safari app that available on a physical iOS device except that you have to use the mouse and not touch gestures to interact with the app.
The free plan offers 30 minutes of testing. And in addition to the iOS Simulator, Browser Stack also includes emulators for various Android devices.

If you do not wish to show your exact location in Tweets, you can either turn off geo-tagging or attach a random location.

On Twitter, if you do not wish to reveal your geographic location in your tweets, you can either completely disable the location feature from Twitter settings or you can can attach some random (read, fake) location to your tweet.
For instance, here’s a recent tweet that specific my location as the White House in Washington DC though it was written from a place that is at least 8000 miles away.
Tweet Location
Fake your geographic location on Twitter

Attach any Location to your Tweets

Now most Twitter mobile clients won’t let you attach random locations to your tweets but there’s a web-based app called PleaseDontStalkMe.com that may come handy here. Here you can pick any location on a Google Map – either drag the marker or use the search box to reach an exact address – and tweet.
Since the Twitter website no longer displays the app name that was used to send that tweet, your followers on Twitter are less likely to know that you faked your location in the tweet. Do remember to limit the length of your tweet to 140 characters else the tweet would fail but without offering an explanation.
You can geotag your tweets from the Twitter.com website as well (click the Location icon near the tweet button) but in that case, you can only attach a city-level location to the tweet and not an exact location.

You can watch any YouTube video or entire video playlists outside the browser using the VLC Media Player. And the videos will play without the ads.


Do you know that VLC Media Player, the world’s favorite video player that supports nearly every video format, can also play YouTube videos on your desktop without requiring the web browser or the Adobe Flash player.
To get started, open the VLC player, press Ctrl+N to open the Network URL dialog and paste any YouTube video URL in the input box.
YouTube in VLC Media Player

The Benefits of Watching YouTube Videos with VLC

The streaming videos will play inside VLC Media Player just like any other local video file while offering some additional benefits not available inside the standard YouTube player. For instance:
  1. You can choose Video -> Always on Top inside VLC and the YouTube video window will stick to the foreground while you work on other tasks.
  2. Press the Loop button in the player controls and the YouTube video will play non-stop in a loop (also possible with Chrome add-ons).
  3. You can change the Playback speed of the YouTube video and make it run slower or faster than the normal speed.
  4. Use the Tools -> Take Snapshot option to capture a screenshot image of any frame or scene in the YouTube video.
  5. Watch the YouTube videos without the ads. I played a couple of movies and music videos inside VLC and none of them carried any pre-roll ads.

Play YouTube Playlists inside VLC

VLC, by default, only supports single YouTube URLs but it also possible to import an entire YouTube Playlist into VLC and watch all the videos in sequence.
Play YouTube Playlists inside VLC
You can watch an entire playlist of YouTube videos inside VLC Media Player.
Here’s the trick. Right-click and save this file to your desktop. Now open the VLC installation folder (%ProgramFiles%\VideoLAN\VLC) and move the .lua file into the exiting /lua/playlist folder.
Restart the VLC Media Player and choose Media -> Open Network Stream. Now paste the URL of any public YouTube Playlist here and the enjoy the videos.
In addition to YouTube, VLC Player can also play DailyMotion videos outside the browser. It is supposed to work with Vimeo videos as well but that is currently broken possibly due to a change in the URL structure at Vimeo’s end. Thanks

The browser window size is a more important metric than screen resolution and you can use Google Analytics to track that number.

Google Analytics reports the “screen resolution” of the visitor’s computer but skips the other important metric which is the size of the browser window. These two numbers will be approximately similar if the browser window is kept in maximized state but not otherwise.
Take a look at the example below. The screen resolution of the desktop is 1920×1080 (this is the number recorded by Google Analytics) but the actual browser window size (where your website is displayed) is a little over 900×600 pixels.

Google Analytics displays the Screen Resolution and not the actual Browser Size of the visitor.
The screen resolution is a less-useful metric and what you really need to know is the actual size (or range) of the browser window of your visitors. This data can be easily gathered through Google Analytics – simply copy-paste the following code snippet just before the closing </body> tag of your website template:
<script type="text/javascript">
 var width  = window.innerWidth  || document.body.clientWidth;
 var height = window.innerHeight || document.body.clientHeight;

 width  = Math.round(width/100)*100;
 height = Math.round(height/100)*100;

 var size = width + "x" + height;
 _gaq.push(['_trackEvent', 'Browser Size', 'Range', size]);
</script>
It calculates the actual height and width of the browser window and then rounds off these numbers to the nearest 100. For instance, a browser size of 985×1190 pixels is recorded as 1000×1200 pixels. You can then access this data in Google Analytics through Content -> Events -> Overview and then choose “Browse Size” as the Events Category.
Once you know the popular “ranges,” you can update the site layout and placement accordingly so that visitors can see all the important elements on your pages Above the Fold without having to use the scroll bar.

You can use Google Images to find pictures of a particular size (or resolution) using the undocumented imagesize search operator.


Google Images previously offered a useful “search by size” option to help you find images by their exact size (or resolution).
For instance, you could limit your search for landscape photographs to image files that were at least 10 Megapixels in size. Or, if you are were using Google Image search to find wallpapers for the desktop, you could specify the image resolution as 1920×1080 pixels and Google would only return large images with those exact dimensions.
Google Image Search by Size
The “exact size” search option is missing in the new Google Images but you can still limit your searches to a particular size by using the “imagesize” search operator in the query itself (see the above screenshot).
Enter the search terms as before and then add IMAGESIZE:WIDTHxHEIGHT to the query. Once you hit Enter, Google Images will remove the operator from the query but the results will only display images that match the specified size.
The search by size operators works on the mobile version of Google as well.

A sitemap file indirectly reveals the total number of Windows 8 Apps that are currently available in the Windows Apps Store.


Windows 8 Apps
Do you know how many Windows 8 Apps are available in the Windows Store?
The Microsoft website says that there are “tons of apps” for Windows 8 and Windows RT in the Windows Store but they haven’t revealed the exact numbers yet.
It turns out that there are 17,041 Windows 8 Apps in the Window Store (as on December 7, en-US) and if you want to dig a little deeper, download this text file as it includes a link to every Windows 8 app that’s currently available in the store .
How did I arrive at this number? Well there’s a sitemap file on apps.microsoft.com website, the domain that also hosts the Windows Store, which solves the mystery.
These always-updated XML sitemap files exist to help web search engines index the online Apps Store  and therefore should have entries corresponding to every app available in the Windows Store. The entries are  further split in 37 files (see a sample) and if you combine them all, it isn’t hard to calculate the actual number of Windows 8 Apps.
See more coverage of Windows 8.