Tuesday, 25 December 2012

diy-gps-module

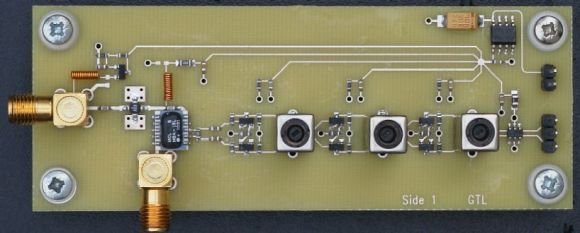
[Andrew Holme] wrote in to tell us about some work he’s done to improve his scratch-built GPS receiver. He figured out a way to use the same hardware but double the number of satellites it can track to a total of eight. When we looked at the original hardware about a year ago it was limited to monitoring just four satellites. That’s the bare minimum for calculating position data. This will not only help increase the accuracy, but remove the problems that would have been cause if just one satellite was dropped because of an obstruction or other issue.
His solution is based entirely on using the FPGA in a different way. He had taken up almost all of the gates available in the Xilinx Spartan 3 chip. Now he’s implemented a CPU on the chip and is able take some of the work off of the hardware gate design by running code on it. He also found and squashed a bug in how the data was processed. He says his original work wasn’t taking into account the rotation of the earth when determining position. All of these improvements put his accuracy at +/- five meters even when he’s not tracking all eight satellites!

SOURCE  -  hackaday


portable-audio-rig
[Michael] wanted a stereo that he could use outside, be it at the beach, beside the pool, or while tailgating. He decided to build this boom box himself, and didn’t cut any corners when it came to a professional looking finish.
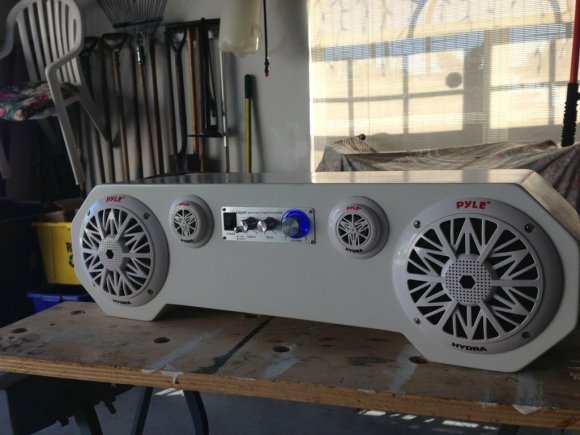
Because of the locale in which he plans to use the stereo he went with a set of marine speakers. They’ll have no problem standing up to water, and since they’re used in boats they should also be able to take a beating during transport. To feed it he uses a Lepai T amp which is seen above.
After cutting each piece of the case out of MDF he started working on the openings to receive the components. This involved quite a number of layout lines and some work with a compass to map out the circular openings. He built a recessed panel on the back to interface the power cord for charging. Inside is an 18 Ah battery. A set of switches lets him turn on the charger and choose between powering the amp from battery or from the power cord

SOURCE - hackaday

If you are using a router in your home network it is very important to keep your firmware updated.  Firmware is software which is embedded into your router’s hardware.  Since a majority of people own Linksys wired or wireless routers, I will show the steps on Linksys WRT54GS.  Depending upon the brand of router you own the steps will vary but the process is basically the same. 

Before proceeding your going to want to determine what version of firmware you are running and then go to the manufacturers website and download the latest version available.  Store the new firmware update in an easy to access location on your hard drive. 
First you need to log into your router.  Open a web browser and type in 192.168.1.1 and hit enter.  You will need to enter in your user name and password.  Which brings up another great point, change the default password on your router otherwise a hacker will have a field day with your network

1

Now that you are in your Linksys Router you will be able to see which Firmware Version you are running.  Choose the Administration tab.  In the Administration section you can change the password for your router.  You can also see the Firmware Upgrade sub menu.  Click on this for the firmware upgrade.


In this window just browse to the location where you stored the new version of the firmware then click the Upgrade button.


That’s it!  Your done!  Upgrading the firmware adds additional stability, features and security to the router.

How to Access Your Router If You Forget the Password

router-header
Routers protect their web interfaces, where you can configure their networking, parental control, and port forwarding settings, with a username and password. These default passwords can be changed to protect the router’s settings.
If you’ve forgotten a router’s password – or if you acquired a used router and don’t know its password – there’s a way to reset the password. You may also be able to forward ports without knowing the password.
Image Credit: tnarik on Flickr

Find the Default Username and Password

Before resetting your router to its default settings, you should first try using the default username and password to log in. You’ll need these anyway if you plan on resetting the router to its factory default settings. There are several ways to find this information:
  • Read your router’s manual. Different models of routers – even ones from the same manufacturer – often have different username and password combinations. To locate the default username and password for the router, look in its manual. (If you’ve lost the manual, you can often find it by searching for your router’s model number and “manual” on Google. Or just search for your router’s model and “default password”.)
  • Look for a sticker on the router itself. Some routers – particularly ones that may have come from your Internet service provider – ship with unique passwords. These passwords may sometimes be printed on a sticker on the router itself.
  • Try a common username and password combination. Many routers use the password “admin”  (don’t type the quotes) and a blank username, a blank password and “admin” as the username, or “admin” as both the password and username. You can find a fairly comprehensive list of default usernames and passwords for various routers on RouterPasswords.com.

Try to log in with the default credentials after finding them – it’s possible the router was already reset or someone never changed its password. If they don’t work, continue to the next section – you’ll need the default credentials after resetting the router.

Reset the Router to Factory Defaults

Routers come with a button you can press to reset the router to its default factory settings. This resets any configuration changes you’ve made to the router – forwarded ports, network settings, parental controls, and custom passwords will all be wiped away. You’ll be able to access the router with its default username and password, but you may have to spend some time configuring the router again, depending on how many changes you made to its configuration.
The exact process (and location of the reset button) will vary from router to router. For best results, you should consult your router’s manual for any model-specific instructions. However, the process is generally very similar on most routers.
First, look at the back (or perhaps the bottom) of the router. You’ll see a special button labeled Reset. This button is often located in a depressed hole, known as a “pinhole,” so you can’t accidentally press it.

To reset the router, you’ll generally need to press this button and hold it down for about 10 seconds. After you release the button, the router will reset itself to the factory default settings and reboot. If the button is located in a pinhole, you’ll need to use a bent paperclip or another long, narrow object to press and hold it.
Once you’ve pressed the button down for long enough, you can log into the router with its default username and password.

Image Credits: William Hook on Flickr and DeclanTM on Flickr

How to Forward Ports Without Knowing the Password

Do you just want to open the router’s web interface and forward ports for a server, game, or other type of networked program? If so, you don’t necessarily even have to know the password. This trick is also useful if you’re using someone else’s network and don’t have access to the password.
This works because many routers support Universal Plug and Play (UPnP), which allows programs on your computer to “ask” the router to open ports for them. If UPnP is enabled on the router, it will automatically open the port.
If a program supports this option, you’ll generally find it in its connection settings alongside the port configuration. NAT-PMP, which you may also see, is a similar way of automatically forwarding ports that fewer routers support.

If you use a program that doesn’t include integrated support for UPnP, never fear – you can use a program like UPnP PortMapper to quickly forward ports from a desktop application. You can forward any ports you like.


Once you’ve reset the router’s settings, you can log in with the default username and password and change its password from its web interface.

SOURCE - HOWTOGEEK

ENJOY --------------------------------------------------------------------------------------------------
ou’ve always got a trusty bootable USB flash drive with you to solve computer problems, but what if a PC’s BIOS won’t let you boot from USB? We’ll show you how to make a CD or floppy disk that will let you boot from your USB drive.
sshot-1
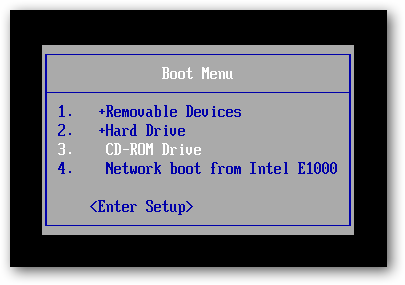
This boot menu, like many created before USB drives became cheap and commonplace, does not include an option to boot from a USB drive.
A piece of freeware called PLoP Boot Manager solves this problem, offering an image that can burned to a CD or put on a floppy disk, and enables you to boot to a variety of devices, including USB drives.
Put PLoP on a CD
PLoP comes as a zip file, which includes a variety of files. To put PLoP on a CD, you will need either plpbt.iso or plpbtnoemul.iso from that zip file. Either disc image should work on most computers, though if in doubt plpbtnoemul.iso should work “everywhere,” according to the readme included with PLoP Boot Manager.
Burn plpbtnoemul.iso or plpbt.iso to a CD and then skip to the “booting PLoP Boot Manager” section.
Put PLoP on a Floppy Disk
If your computer is old enough to still have a floppy drive, then you will need to put the contents of the plpbt.img image file found in PLoP’s zip file on a floppy disk.
To do this, we’ll use a freeware utility called RawWrite for Windows.
sshot-6
We aren’t fortunate enough to have a floppy drive installed, but if you do it should be listed in the Floppy drive drop-down box. Select your floppy drive, then click on the “…” button and browse to plpbt.img. Press the Write button to write PLoP boot manager to your floppy disk.
sshot-7
Booting PLoP Boot Manager
To boot PLoP, you will need to have your CD or floppy drive boot with higher precedence than your hard drive. In many cases, especially with floppy disks, this is done by default.
If the CD or floppy drive is not set to boot first, then you will need to access your BIOS’s boot menu, or the setup menu. The exact steps to do this vary depending on your BIOS – to get a detailed description of the process, search for your motherboard’s manual (or your laptop’s manual if you’re working with a laptop).
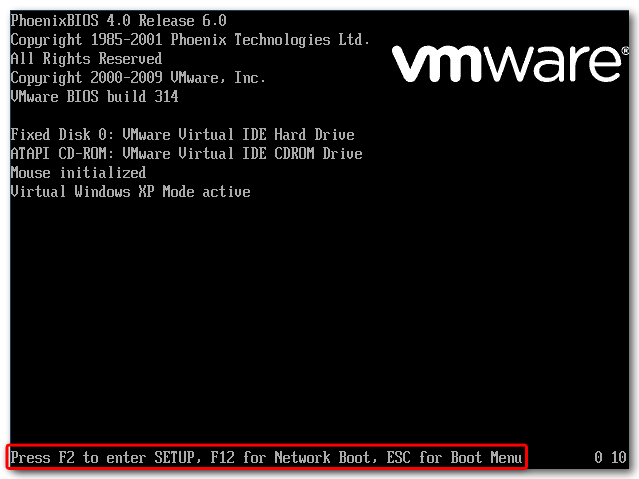
In general, however, as the computer boots up, some important keyboard strokes are noted somewhere prominent on the screen. In our case, they are at the bottom of the screen.
sshot-18
Press Escape to bring up the Boot Menu. Previously, we burned a CD with PLoP Boot Manager on it, so we will select the CD-ROM Drive option and hit Enter.
sshot-2
If your BIOS does not have a Boot Menu, then you will need to access the Setup menu and change the boot order to give the floppy disk or CD-ROM Drive higher precedence than the hard drive. Usually this setting is found in the “Boot” or “Advanced” section of the Setup menu.
sshot-17
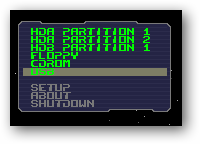
If done correctly, PLoP Boot Manager will load up, giving a number of boot options.
sshot-3
Highlight USB and press Enter.
sshot-4
PLoP begins loading from the USB drive.
sshot-5
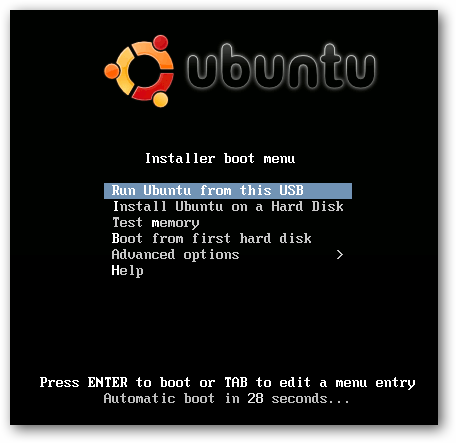
Despite our BIOS not having the option, we’re now booting using the USB drive, which in our case holds an Ubuntu Live CD!
sshot-8
This is a pretty geeky way to get your PC to boot from a USB…provided your computer still has a floppy drive. Of course if your BIOS won’t boot from a USB it probably has one…or you really need to update it.
Download PLoP Boot Manager
Download RawWrite for Windows
 
ENJOY ---------------------------------------------------------------------------------------------------------------------

If you forgot the administrator password you can easily reset the password on Windows 7, Windows Vista and Windows XP with the Sticky Keys tricks. It works always.

Forgot the administrator password? There are many ways to access a Windows installation if you forgot the administrator password. Today I’ll show you another procedure to reset the Windows password by replacing the Sticky Keys application. This program allows you to use the function keys SHIFT, CTRL, ALT, or the Windows key by typing one key after the other instead of pressing them simultaneously with the second key. The main advantage of this password reset method is that you don’t need third-party software; another plus is that it is easy to carry out because no Registry hack is required, as when you offline enable the built-in administrator.
Forgot Administrator Password - Sticky Keys trick
Please note that resetting the password from an account other than the corresponding user account always means that the user loses the credentials stored in the Windows Vault, stored Internet Explorer passwords, and files that you encrypted with the Encrypting File System (EFS). Of course, if you have a backup of these credentials, you can restore them; likewise, if you have exported the private EFS key, you can import it again after you have reset the password.
Like with all other solutions that allow you to reset the Windows password without having an account on the corresponding computer, you have to boot from a second operating system and access the Windows installation while it is offline.
You can do this with a bootable Windows PE USB stick or by using Windows RE. You can start Windows RE by booting the Windows Vista or Windows 7 setup DVD and then selecting “Repair” instead of “Install Windows.”
By the way, you can’t use the Windows XP boot CD for this purpose because its Recovery Console will ask for a password for the offline installation. However, you can use a Vista or Windows 7 DVD to reset a forgotten Windows administrator password on Windows XP.
This works because Windows RE, which is based on Vista or Windows 7, will let you launch a command prompt with access to an offline installation without requiring a password.

To reset a forgotten administrator password, follow these steps:

  1. Boot from Windows PE or Windows RE and access the command prompt.
  2. Find the drive letter of the partition where Windows is installed. In Vista and Windows XP, it is usually C:, in Windows 7, it is D: in most cases because the first partition contains Startup Repair. To find the drive letter, type C: (or D:, respectively) and search for the Windows folder. Note that Windows PE (RE) usually resides on X:.
  3. Type the following command (replace “c:” with the correct drive letter if Windows is not located on C:):
    copy c:\windows\system32\sethc.exe c:\
    This creates a copy of sethc.exe to restore later.
  4. Type this command to replace sethc.exe with cmd.exe:
    copy /y c:\windows\system32\cmd.exe c:\windows\system32\sethc.exe
    Reboot your computer and start the Windows installation where you forgot the administrator password.
  5. After you see the logon screen, press the SHIFT key five times.
  6. You should see a command prompt where you can enter the following command to reset the Windows password (see screenshot above):
    net user your_user_name new_password
    If you don’t know your user name, just type net user to list the available user names.
  7. You can now log on with the new password.
I recommend that you replace sethc.exe with the copy you stored in the root folder of your system drive in step 3. For this, you have to boot up again with Windows PE or RE because you can’t replace system files while the Windows installation is online. Then you have to enter this command:
copy /y c:\sethc.exe c:\windows\system32\sethc.exe

SOURCE ----- 4SYSOPS
ENJOY ----------------------------------------------------------------------------------------------------------------------


It happens to everyone at some point—you create a new password and don’t remember to save it somewhere, and then before you know it you’ve forgotten what it was. Here’s how to reset the password on your Mac OS X computer.
If you’ve got a Windows PC and you want to reset your password, you can do so easily with the Ubuntu Live CD or the System Rescue CD in just a couple of minutes. Or you could always crack your password if you wanted.
Luckily for us, OS X has some very simple tricks that can reset a forgotten password without going to a lot of trouble.

Method One: Using the Install Disk

The first method we will look at is the OS X Installation Disk, so grab yours and put it into the drive. Once you have booted off the disk you will need to choose your language, and then OS X will prepare the installation environment.

Then you will choose the Utilities menu and choose Reset Password.

Now you need to choose the volume with the account you need to change the password for, choose the account from the drop down, and generate your new password and password hint if you wish to use one.
Note: You may want to reset the ACLs while you are here since you have changed your password. Once you are done, you can save and restart the computer.

Now you can login to your OS X computer with your newly made password.

Method Two: Tricking OS X Into Running the First Boot

The other, and possibly easier way to get around a forgotten password requires booting into Single User Mode and removing a file that tells OS X that the first boot setup has run.
To boot into Single User Mode, you’ll need to reboot the computer while pressing and holding the Command and S keys after you hear the startup gong.
Once you have booted into Single User Mode you will need to mount the volume you need to get into. Most of the time this will just be your boot disk and can be mounted as “/”. This command will mount that for you:
sudo mount -uw /
Next we need to remove the file that tells OS X that its already done the setup:
rm -rf /var/db/.AppleSetupDone
Now we need to reboot using the very logical reboot command.
reboot
Once we boot back up it will be just like the first time you boot after install and you will see the Welcome screen, and just click through the first two screens.
When you reach the screen that asks if you already own a Mac, make sure to choose “Do not transfer my information now” since we’re not doing any migrating of data.

Once you reach the “Enter Your Apple ID” screen, you can press the Command and Q keys at the same time to get past the rest of the prompts. Click Skip when asked.

Now you will create a new Administrator account. You can choose to name it something you wish to keep or anything since you just need this account to get into the OS and to System Preferences.

Click through the next screens until you reach the Thank You screen, and we’re finally done with that part of the process. Click Go and you’ll be brought into the new account.

Once the new account has loaded you can now go to your System Preferences. We will want the Accounts pane.

Now select the account with the password you want to reset and click Reset Password…

Choose your new password, and password hint if you desire, and click Reset Password.

You can now logout and login to the account with the new password

 ENJOY -------------------------------------------------------------------------------------------------

The old windows cracking would wont work for the latest windows 7 and 8 ,,there hence  cracking windows password by using OPCRACk

image
Here at How-To Geek, we’ve covered many different ways to reset your password for Windows—but what if you can’t reset your password? Or what if you’re using drive encryption that would wipe out your files if you changed the password? It’s time to crack the password instead.
To accomplish this, we’ll use a tool called Ophcrack that can crack your password so you can login without having to change it.

Download Ophcrack

The first thing we will need to do is download the CD image from Ophcrack’s website. There are two options to download, XP or Vista, so make sure you grab the right one. The Vista download works with Windows Vista or Windows 7, and the only difference between XP and Vista is the “tables” Ophcrack uses to determine the password.

Once the .iso file is downloaded, burn it to a CD using the guide below.

If you are going to be cracking your password on something that doesn’t have a CD drive, such as a netbook, download the universal USB creator from PenDrive Linux (Link Below). A USB drive will not only run faster but you can also use a single USB drive for Windows XP, Vista, and 7 if you copy the needed tables to the drive.

To create a USB drive that works with all versions of Windows, download the free password tables from Ophcrack’s website.
Note: There are free tables available on Ophcrack’s website and there are paid tables, the paid tables will typically get the job done faster and will be able to crack more complex passwords but the paid tables may not fit on a USB drive because they range in size from 3 GB to 135 GB.

Now extract the tables to \tables\vista_free on the USB drive and they will be used automatically by Ophcrack.

Boot from CD/USB

Boot the computer from the CD or USB drive that you created.
Note: On some computers you may have to go into the BIOS settings to change the boot order or push a key to show the boot menu.
image
Once the disk is done booting, Ophcrack should start automatically and will begin cracking the passwords for all of the users on your computer.
Note: If the computer boots and you only have a blank screen or Ophcrack doesn’t start, try restarting the computer and selecting manual or low RAM options on the live CD boot menu.

If you have a complex password it will take a lot longer than simple passwords, and with the free tables your password may never be cracked. Once the crack is done you will see the password in plain text, write it down and reboot the machine to login. If your password isn’t cracked, you can also log in as one of the other users with admin rights and then change your password from within Windows.

With the free tables available you will not be able to crack every password, but the paid tables range from $100 to $1000 so you may be better off just resetting your password with on of these tutorials:
You can get all of the software needed for password cracking from these links.
If you aren’t using drive encryption and you’ve got a tough password, it’s usually much faster to reset the password using one of the tools above, but we like to show you all the different techniques that you can use.

SOURCE - HOWTOGEEK

in ADDITION TO HOWTOGEEK I HAVE SOURCE T DOWNLOAD PAID TABLES ,DOWNLOAD FROM HERE ( ITS MAGNET LINK SO USE BITORRENT OR UTORRENT ) ---


ENJOY ---------------------------------------------------------------------<><><><><><><><><><>

 boot : beginners guide 

bios-boot-order-header
The boot order in your computer’s BIOS controls which device it loads the operating system from. Modify your boot order to force your computer to boot from a USB drive, CD or DVD drive, or another hard drive.
You may need to change this setting when booting from another device, whether you’re running an operating system from a live USB drive or installing a new operating system from a disc.
Note: This process will look different on each computer. The instructions here will guide you through the process, but the screenshots won’t look exactly the same.

Access the BIOS

To access the BIOS, you’ll need to restart your computer and press a specific key at the start of the boot process. This key is generally displayed on-screen during the boot process. For example, you may see a message that says “Press <DEL”> to enter setup” or “Press F2 to access the BIOS.” Press the required key at the correct time and your computer’s BIOS will appear.

While Delete and F2 are probably the most common keys, your computer may require another key, such as F1, Escape, or Ctrl+Alt+Escape. If you don’t see the required key on-screen, consult your computer’s manual or search for your computer’s model name and “bios key” on Google.
(If you built your own computer, consult the motherboard’s manual instead.)

Locate the Boot Options

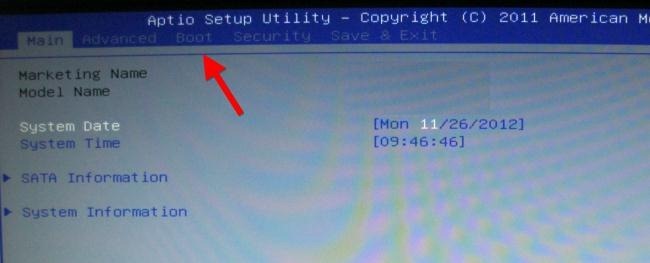
Once you’re in the BIOS, look for some sort of “Boot” option menu. If you’re lucky, there will be a tab at the top of the screen named Boot. If not, this option may be located beneath another tab.

Use the arrow keys to navigate through the BIOS. To select something, press Enter. You’ll generally see a list of the keys you can use at the bottom-right corner of your screen.

Change the Boot Order

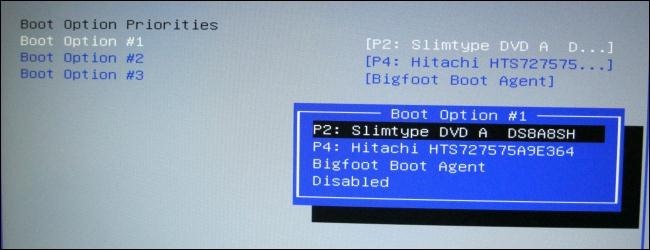
Locate the boot order screen that lists the boot devices. This may be on the Boot tab itself or beneath a Boot Order option.

Select an option and press Enter to change it, either to disable it or specify another boot device. You can also use the + and – keys to move devices up or down in the priority list. (These steps may be slightly different on some computers; consult the list of keyboard shortcuts on your screen.)

Note that “USB drive” doesn’t appear as an option in the list, even though our computer has USB ports. If we connected a USB device to the computer before starting our computer and accessing this screen, we’d see the USB drive option in the list. Some computers display the USB drive option even when a drive isn’t connected, while some don’t.
The boot order is a priority list. For example, if “USB drive” is above “hard drive” in your boot order, your computer will try the USB drive and, if it’s not connected or no operating system is present, boot from the hard drive.

Save Your Settings

To save your settings, locate the Save & Exit screen. Select the Save Changes and Reset or Save Changes and Exit option and press Enter to save your changes and restart your computer.
You may also be able to press a specific key to save your settings and reset the computer. Ensure you select the “save and exit” option, not the “discard changes and exit” option.

Once your computer restarts, it will boot using your new boot order priority.

Bonus: Using A Boot Menu

To reduce the need to change your boot order, some computers have a Boot Menu option.

Press the appropriate key – often F11 or F12 – to access the boot menu while booting your computer. This allows you to boot from a specific hardware device once without changing your boot order permanently.


Most new computers will soon be using UEFI instead of the traditional BIOS, but PCs with traditional BIOSes will be with us for a long time to come. While different computers use different BIOS keys and have different BIOS layouts, the process is similar on all computers using the traditional BIOS.

source - howtogeek.com

ENJOY ----------------------------------------------------------------------------------------------